

A geofence is a virtual boundary drawn on a digital map that triggers a real-time alert when a vehicle crosses it. Completing a geofence setup on an approved car tracker means those alerts are tied to a device certified by Thatcham Research, the UK’s central automotive risk intelligence organisation. That certification matters because UK insurers increasingly require it, and the right setup directly affects both your vehicle’s security and your insurance premium. This guide covers everything car owners and fleet managers need to configure, test, and maintain geofences on a Thatcham-approved tracker.
What do you need before a geofence setup on an approved car tracker?

The foundation of any reliable car tracking geofence setup is a certified device, professionally fitted. UK insurers mandate Thatcham-certified S5 or S7 trackers for vehicles valued above £40,000, and professional installation is a condition of keeping that insurance valid. DIY fitting is not accepted. That single fact catches many drivers out.
Before you touch any app or platform, confirm you have the following in place:
- A Thatcham-certified tracker. Either an S5 or S7 category device, independently tested and certified by Thatcham Research.
- Professional installation. Certified installers provide the documentation insurers require. Without it, your theft coverage may be void.
- A compatible tracking app or web platform. Your tracker’s platform must support geofence creation, boundary editing, and alert configuration. Most Thatcham-approved devices come with a dedicated app or web portal.
- A smartphone or computer. You need reliable internet access to draw zones, set preferences, and receive notifications.
- Insurance documentation. Keep your certification paperwork accessible. Insurers may request it when processing claims or applying premium discounts of 5% to 20%.
- A list of key vehicle locations. Knowing where your vehicle parks overnight, where it works from, and any restricted zones saves time during setup.
Pro Tip: Write down your three most important vehicle locations before opening the app. Home, workplace, and any overnight storage site are the best starting points for a first geofence.
How do you set up a geofence on a Thatcham-approved tracker?
The geofence setup process takes only a few minutes and produces near real-time alerts once active. The steps below apply to most Thatcham-approved tracking platforms, though exact menu labels vary by device.
-
Open your tracking app or web portal and select your vehicle. If you manage a fleet, choose the specific asset you are configuring. Confirm the device is online and showing a current GPS position.
-
Navigate to the geofence or zones section. This is typically found under “Alerts”, “Security”, or “Zones” in the main menu. Select the option to create a new geofence.
-
Choose your boundary shape. Most platforms offer two options. A radius-based circle is quickest: place a pin on your target location and drag to set the radius. A custom polygon lets you draw an irregular boundary, which suits driveways, car parks, or industrial sites with unusual shapes.
-
Map your first zone. Start with high-value locations such as home, office, or primary work zones. These reduce alert noise and give you the most useful data immediately. Avoid mapping too large an area at first.
-
Configure your alert preferences. Select whether you want alerts on entry, exit, or both. Exit alerts are most useful for theft detection. Entry alerts suit fleet managers monitoring site arrivals. Both settings together give the fullest picture.
-
Set your notification method and timing. Choose push notification, SMS, or email. If your platform supports time filters, set alerts to activate during off-hours, for example 7 PM to 6 AM, to reduce daytime noise.
-
Name the geofence clearly. Use a label like “Home Overnight” or “Depot Site A” rather than a generic name. Clear labels matter when you are managing multiple zones or reviewing alerts quickly.
-
Save and activate the geofence. Confirm the zone is live in your device list. The tracker will now monitor boundary crossings and send alerts according to your settings.
Pro Tip: Set up no more than two geofences in your first session. Get comfortable with how alerts arrive before adding more zones. This keeps your notification feed manageable from day one.
How do you test and optimise your geofence settings?
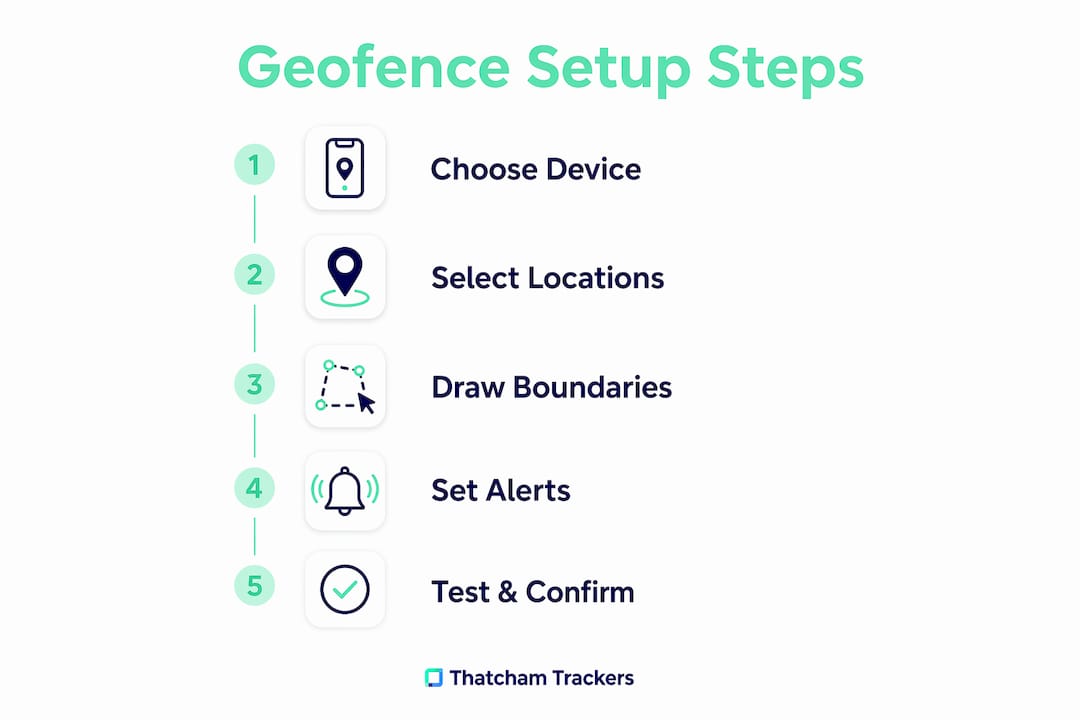
A geofence that has never been tested is a geofence you cannot trust. Physical testing by driving the vehicle out of a defined zone is the only reliable way to confirm alerts fire correctly. Delays or missed alerts often point to poor tracker placement or signal interference.
Run through these checks after your initial setup:
- Drive the vehicle out of the zone deliberately. Time how long it takes for the exit alert to arrive. A well-placed tracker on a certified device should alert within seconds.
- Check for GPS signal interference. GPS alerts rely on clear signal. Trackers fitted inside metal compartments or near dense vehicle electronics can experience delays. If alerts are slow, raise the issue with your certified installer.
- Adjust boundary size if needed. A boundary set too tightly around a parking spot will trigger false alerts every time the vehicle shifts slightly. A boundary set too wide will delay genuine theft alerts. Aim for a zone that reflects realistic vehicle movement.
- Test entry alerts separately. Drive back into the zone and confirm the entry alert fires. Both directions must work reliably.
The most effective approach for overnight protection is layered geofencing: a small immediate zone around the vehicle’s usual parking position, plus a larger outer boundary. Time filters set to activate between 7 PM and 6 AM reduce daytime false alerts significantly. This combination catches genuine boundary breaches without flooding your phone with routine movements.
| Test | What to check | Action if it fails |
|---|---|---|
| Exit alert timing | Alert arrives within seconds | Check tracker placement with installer |
| Entry alert timing | Alert fires on return to zone | Review boundary size and signal quality |
| False alert frequency | No alerts during normal parking | Widen the boundary slightly |
| Time filter accuracy | No alerts during permitted hours | Adjust filter settings in the app |
Common mistakes to avoid when managing vehicle tracking with geofencing
The most common error in vehicle tracking with geofencing is creating too many zones at once. Starting with a small number of critical zones produces actionable alerts and avoids overwhelming notifications. Fleet managers in particular tend to map every site on day one, then disable all alerts within a week because the volume becomes unmanageable.
Avoid these mistakes to keep your setup effective:
- Do not map more than three to five zones initially. Add new zones only after the existing ones have been tested and confirmed reliable.
- Prioritise exit alerts over entry alerts for security use. Exit alerts are the primary theft signal. Entry alerts are more useful for operational fleet management.
- Pair geofencing with motion detection where your device supports it. Motion detection catches vibration and unauthorised movement even when the vehicle has not yet left the geofence. This layered approach catches theft attempts at the earliest stage.
- Never skip professional installation to save money. DIY installation invalidates insurance coverage. The cost of a certified engineer is far lower than a rejected insurance claim.
- Keep all installation and certification documents. Insurers require this paperwork to validate claims and apply premium discounts. Store digital copies alongside your policy documents.
- Review your geofences every few months. Vehicles change routes, depots move, and parking arrangements shift. Outdated zones produce irrelevant alerts and reduce confidence in the system.
Security experts stress that compliance takes priority over convenience. A geofence on a non-certified device may alert you, but it will not satisfy your insurer. The certification and the setup must work together.
Key takeaways
A Thatcham-certified tracker with professionally configured geofences is the most reliable combination for vehicle security and UK insurance compliance.
| Point | Details |
|---|---|
| Certification is non-negotiable | Only Thatcham-certified S5 or S7 trackers satisfy UK insurer requirements for theft coverage. |
| Professional installation is mandatory | DIY fitting invalidates insurance; certified engineers provide the documentation insurers need. |
| Start with three key zones | Home, workplace, and overnight storage give the most useful alerts with the least noise. |
| Test every geofence physically | Drive the vehicle out of each zone to confirm alerts fire within seconds before relying on them. |
| Layer geofencing with motion detection | Combining boundary alerts with motion sensors catches theft attempts before the vehicle moves. |
Geofencing works best when compliance is built in from the start
Thatcham Trackers has seen the same pattern repeatedly. Car owners set up geofences on devices that were never professionally installed, then discover their insurer will not honour a claim because the tracker does not meet Thatcham Research certification standards. The geofence worked perfectly. The compliance did not.
Fleet managers face a different version of the same problem. They configure dozens of zones across multiple sites, receive hundreds of alerts daily, and eventually stop checking them. The fix is not a better app. It is fewer, better-placed zones reviewed on a consistent schedule.
The technology for vehicle tracking with geofencing has become genuinely accessible. Most Thatcham-approved platforms are straightforward to use, and alert configuration takes minutes. The gap between a useful setup and a useless one is almost never technical. It comes down to starting with the right certified device, having it fitted correctly, and keeping the zone configuration simple enough to act on.
For individual car owners, one or two well-tested geofences covering home and a regular parking location is enough to provide meaningful protection. For fleet managers, the discipline of expanding zones gradually, as fleet management professionals recommend, produces far better results than mapping everything at once.
— Thatcham Trackers
Thatcham Trackers: certified devices for compliant geofence setup
Car owners and fleet managers who want geofencing to count with their insurer need to start with the right device.
Thatcham Trackers supplies a full range of Thatcham-approved trackers independently certified by Thatcham Research, covering both S5 and S7 categories. Every device is available with professional installation by a certified engineer, giving you the documentation your insurer requires. Drivers with certified trackers can qualify for premium discounts of 5% to 20%, making the investment straightforward to justify. Browse the full collection at Thatcham Trackers to find the right device for your vehicle and coverage requirements.
FAQ
What is a geofence on a car tracker?
A geofence is a virtual boundary set on a digital map that triggers an alert when a vehicle enters or exits the defined area. On a Thatcham-approved tracker, these alerts are tied to a certified device recognised by UK insurers.
Does geofencing work on all Thatcham-approved trackers?
Most Thatcham-certified S5 and S7 trackers include geofencing as a standard feature through their companion app or web platform. Check your device’s specification before purchase if geofencing is a priority.
Can I set up a geofence myself without a professional installer?
You can configure geofences yourself through the tracking app once the device is fitted. The tracker itself, however, must be installed by a certified engineer. DIY installation invalidates insurance coverage regardless of how well the geofences are configured.
How many geofences should I set up at once?
Start with no more than three zones covering your most important locations. Fleet management professionals recommend expanding gradually after confirming each zone produces reliable, actionable alerts.
Will geofencing reduce my car insurance premium?
A Thatcham-certified tracker can qualify you for premium discounts of 5% to 20%, depending on your insurer. The geofence function itself does not directly reduce premiums; the certification and professional installation of the device do.